
Auto repair shop layout designs are one of the highest-leverage decisions for shop owners. A well-designed floor plan helps increase throughput, technician efficiency and safety compliance.
An auto shop layout design considers both operational decisions of bay sizing, zone organization and vehicle flow. Another is the design decisions of the waiting room, aesthetics and modern floor plans. A well-planned facility improves vehicle flow, reduces unnecessary movement, and creates a cleaner, more professional environment for both employees and customers. An auto shop that runs well and looks good to be in makes a first impression on customers.
This guide covers operational layout strategies alongside design considerations. Smart shop layout planning and technology that helps your shop run its day-to-day operation efficiently, allowing shops to scale efficiently.
1. Auto Repair Shop Floor Plan: The Zone Framework
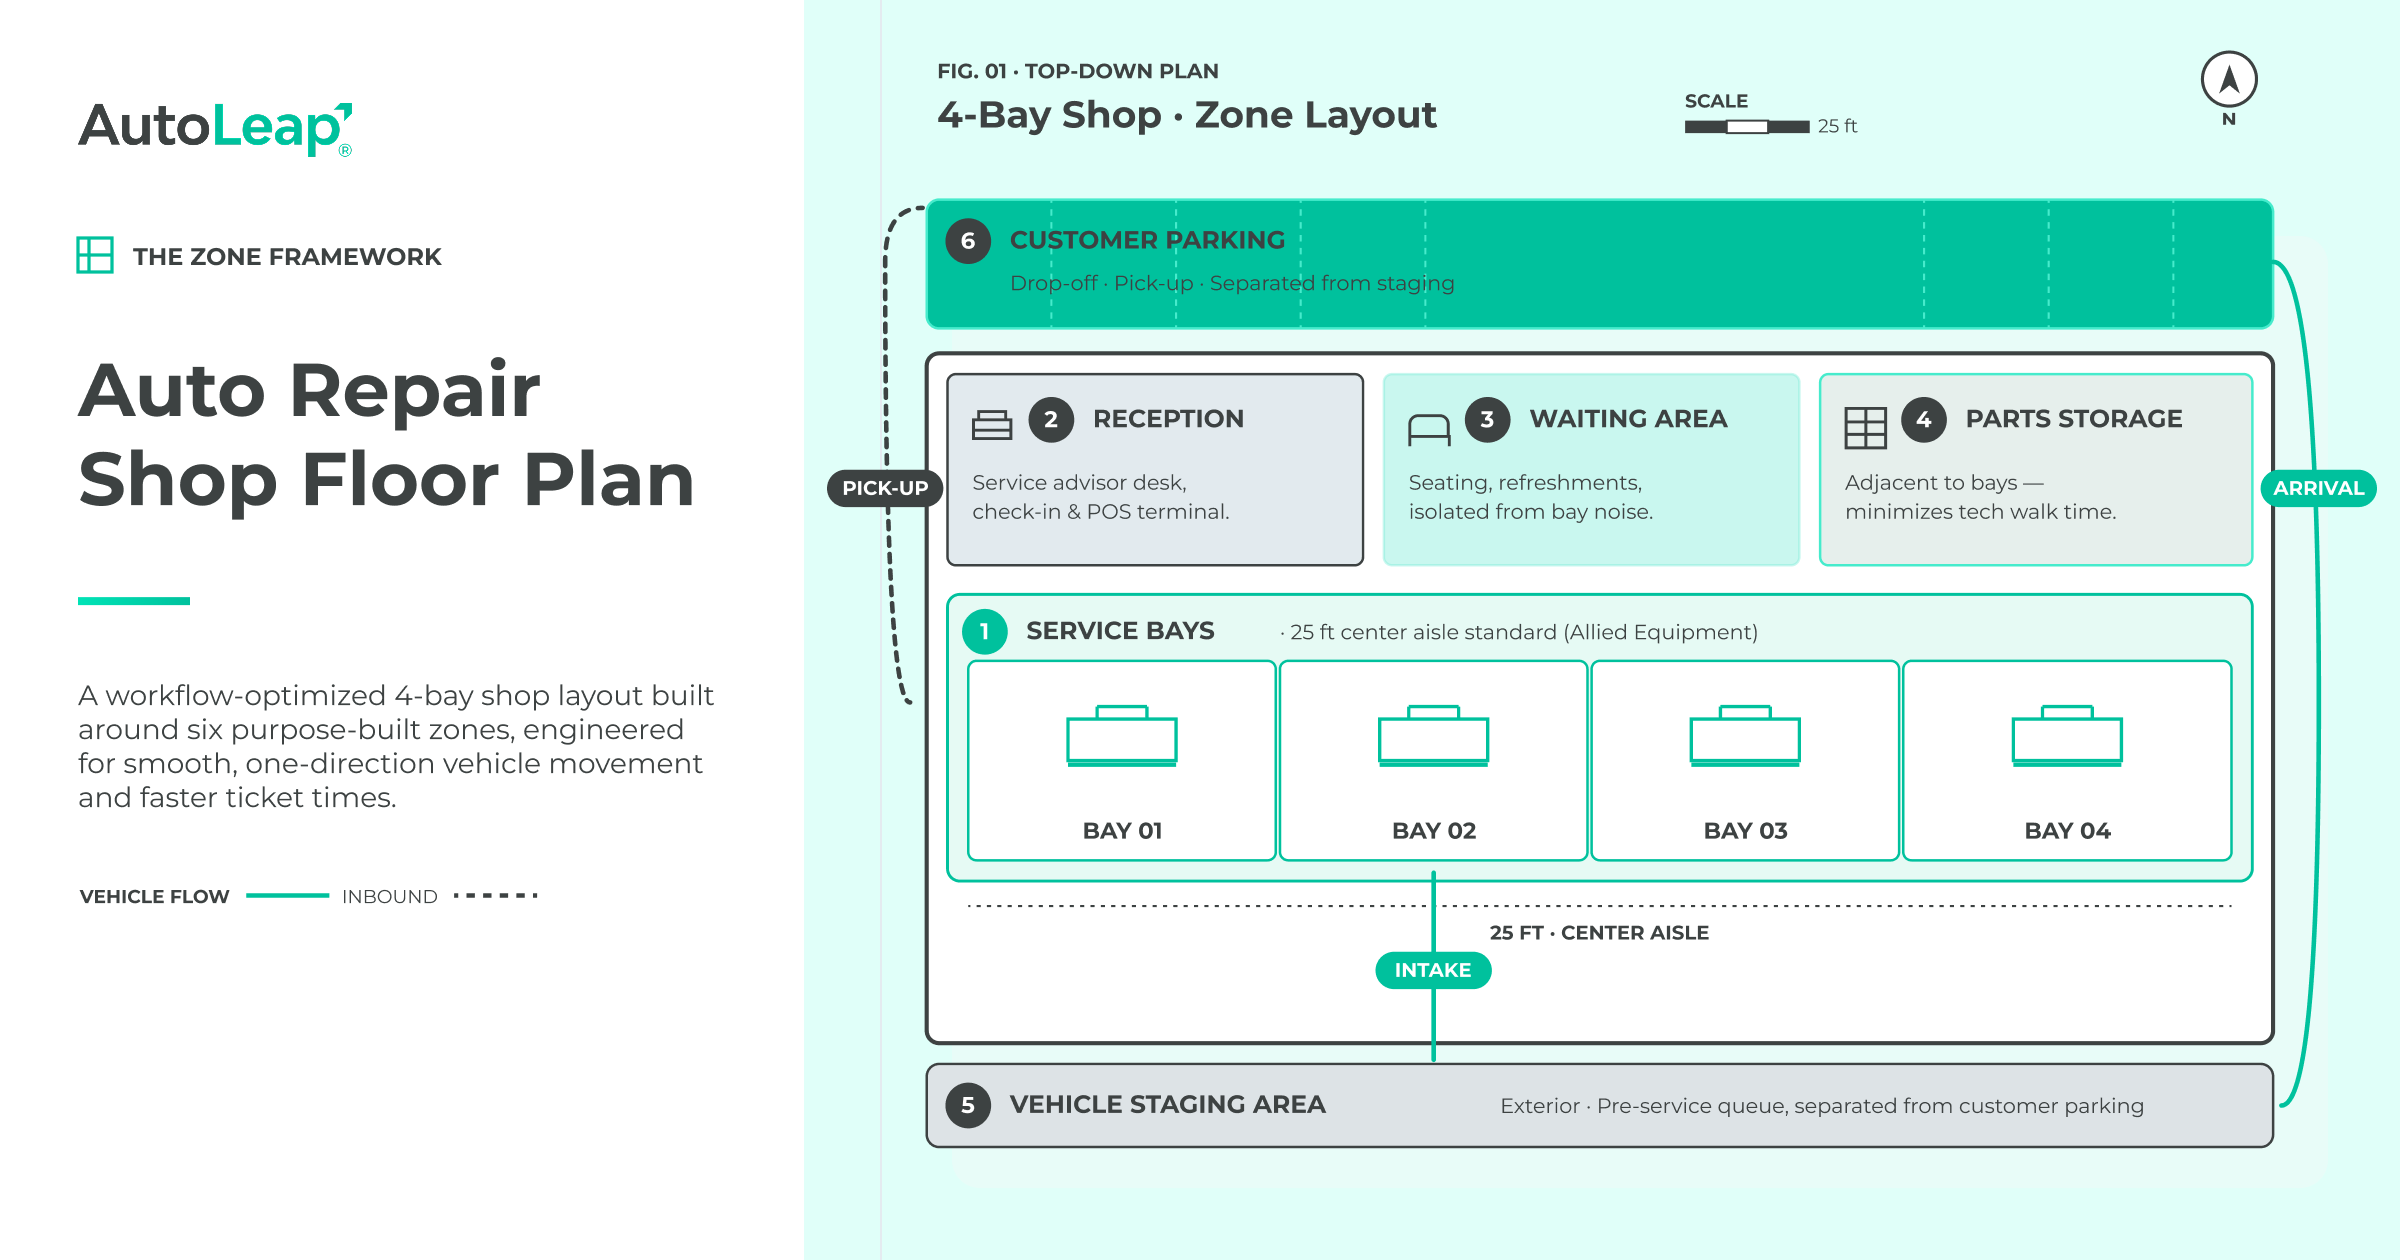
The Six Zones Every Auto Repair Shop Needs
A zone framework is one that divides an auto shop into proper operational areas. A good-looking, professional auto shop requires six core zones. This includes service bays, reception and front office, customer waiting area, parts storage room, vehicle staging area, and customer parking.
- Service bays act as production centres.
- The reception area is for customer queries and service advisor operations
- The waiting area is for customers’ comfort and to maintain privacy. It is kept separate from reception and service bays.
- Parts storage is near the bays, so technicians don’t have to waste time walking.
- Vehicle staging areas are exterior zones where vehicles wait to be assigned to bays. When vehicles are serviced, they are parked for customer pickups without blocking traffic.
- Customer parking is separate from staging and storage.
How Zone Placement Drives Workflow and Revenue
An auto shop can incur losses if there is poor zone placement. When technicians have to walk across the buildings to get parts, they can lose ninety to one hundred eighty minutes of billable labor every day. At a labor rate of one hundred twenty dollars per hour, that equals hundreds in lost daily revenue.
Allied Equipment recommends a minimum 25′ centre aisle between bays for safer vehicle movement and to help decrease traffic congestion during peak service times. When zoned properly, it enhances the workflow of the shop, customer trust, technician efficiency and the long-term profitability of the shop all at once.
The common mistake is combining the reception and waiting area in one place. This disturbs customers during private conversations and reduces customer trust.
2. Service Bay Layout: Dimensions, Lifts, and Technician Workflow
Bay Size Requirements and Lift Placement
Service bay dimensions are dependent on the car lift system and selection. A two-post lift needs at least 11 feet between columns, 25 feet of total bay width and 25-30 feet of depth. This is to easily fit the car, lift arms and working space. Undersized bays are one of the common mistakes shops make. It leads to costly construction, and sometimes it’s impossible to expand space.
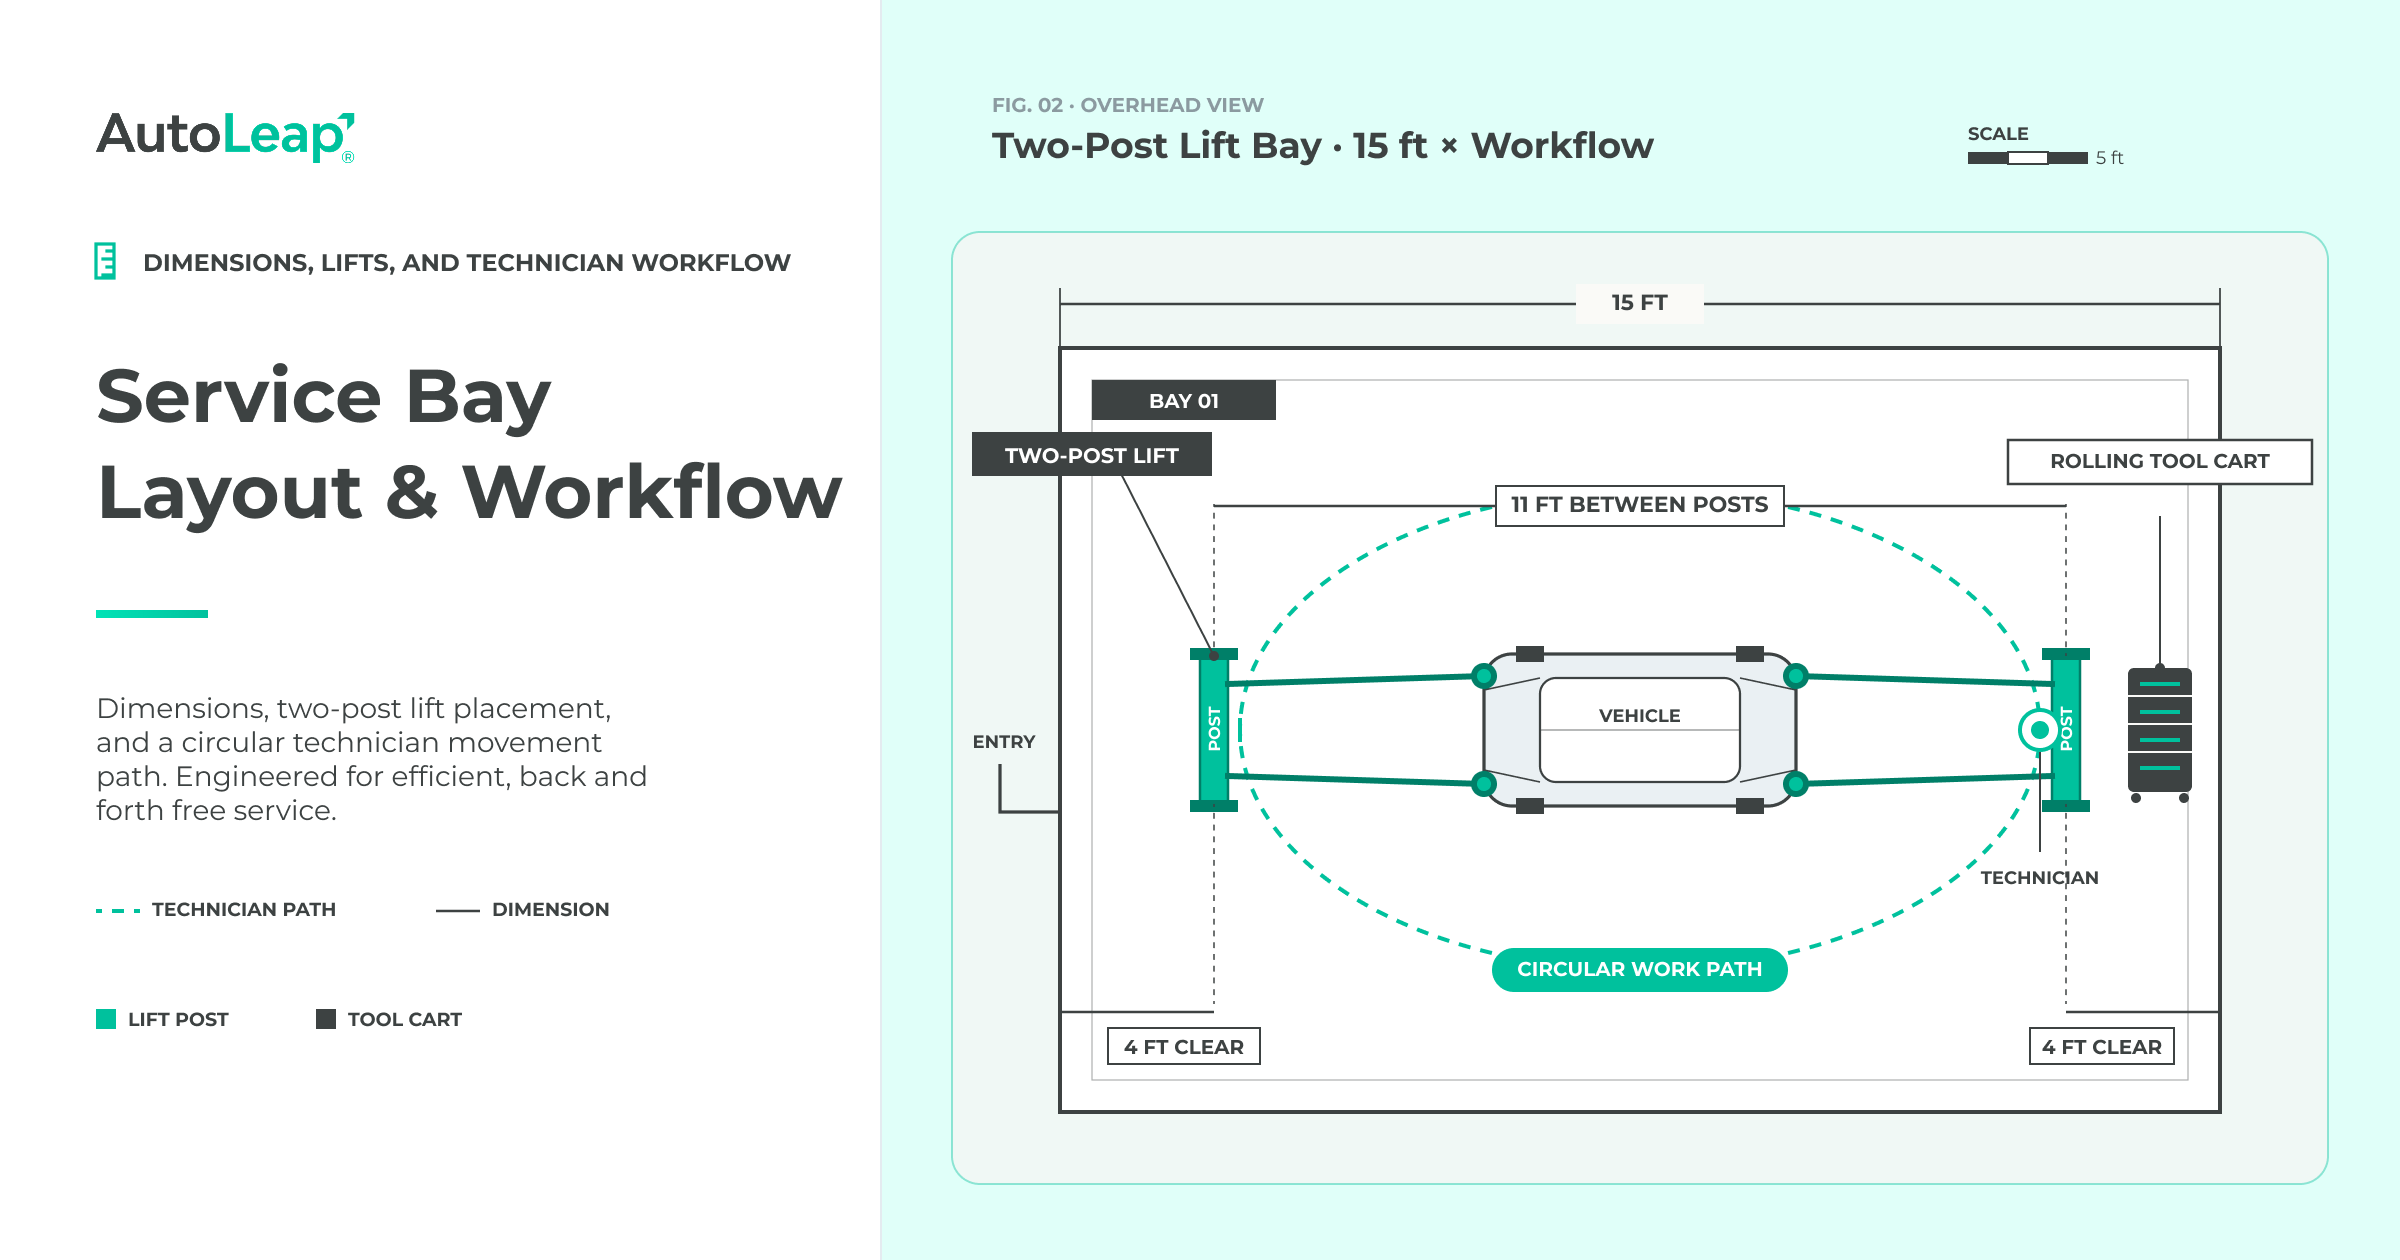
Adequate lift placement is another factor to consider. It needs at least 4 feet of clearance on each side of the columns. This is so that toolbox movement is easier and rear vehicle access is safe. Service bays must also maintain a 3-foot distance from other workspaces for easy door entry and exit and safe egress. Ceiling height should be at least 11 to 12 feet to support full vehicle lift travel.
Tool Organization and the Workflow Cell Model
High-performing bay areas need to have tools and materials within arm’s reach. Each bay should have
- Rolling tool carts: They should be permanently assigned and placed at the rear.
- Wall-mounted shadow board: This is to showcase and organize hand tools.
- Parts staging shelf: It is placed directly beside the vehicle.
This setup helps technicians move in a circular motion while servicing faster. Instead of going back and forth to get the essential mechanic shop equipment for every bay, and increasing service time.
Shop owners make the common mistake of looking at the current workload when designing bays. A too-small initial shop soon reaches a limit on throughput and may not be able to grow because of lease or even building constraints. Also, lifting all the vehicles together without taking into account the entry angles of the vehicles into the bays induces inefficiencies. This is because when the lifts are perpendicular, more manoeuvres are required, and the risk of damage is higher than when the lift is parallel to the bay entry.
In fact, many repair shops today even use the Express Maintenance workflow model. Toyota has instituted a plan to reduce the time a technician spends moving between different parts of the shop and to and from bays, which are self-contained work zones. In this setup, tools, supplies and frequently-used equipment are located around the vehicle. This allows workers to make inspections and repairs without having to frequently cross the shop floor. In multi-bay systems, bay adjacency can play a major role, as poorly located workstations can cause workflow interruptions. As a result, it reduces repair throughput and increases technician fatigue during peak service hours.
3. Exterior Layout: Vehicle Staging, Parking, and Traffic Flow
Vehicle Entry, Staging, and Bay Door Alignment
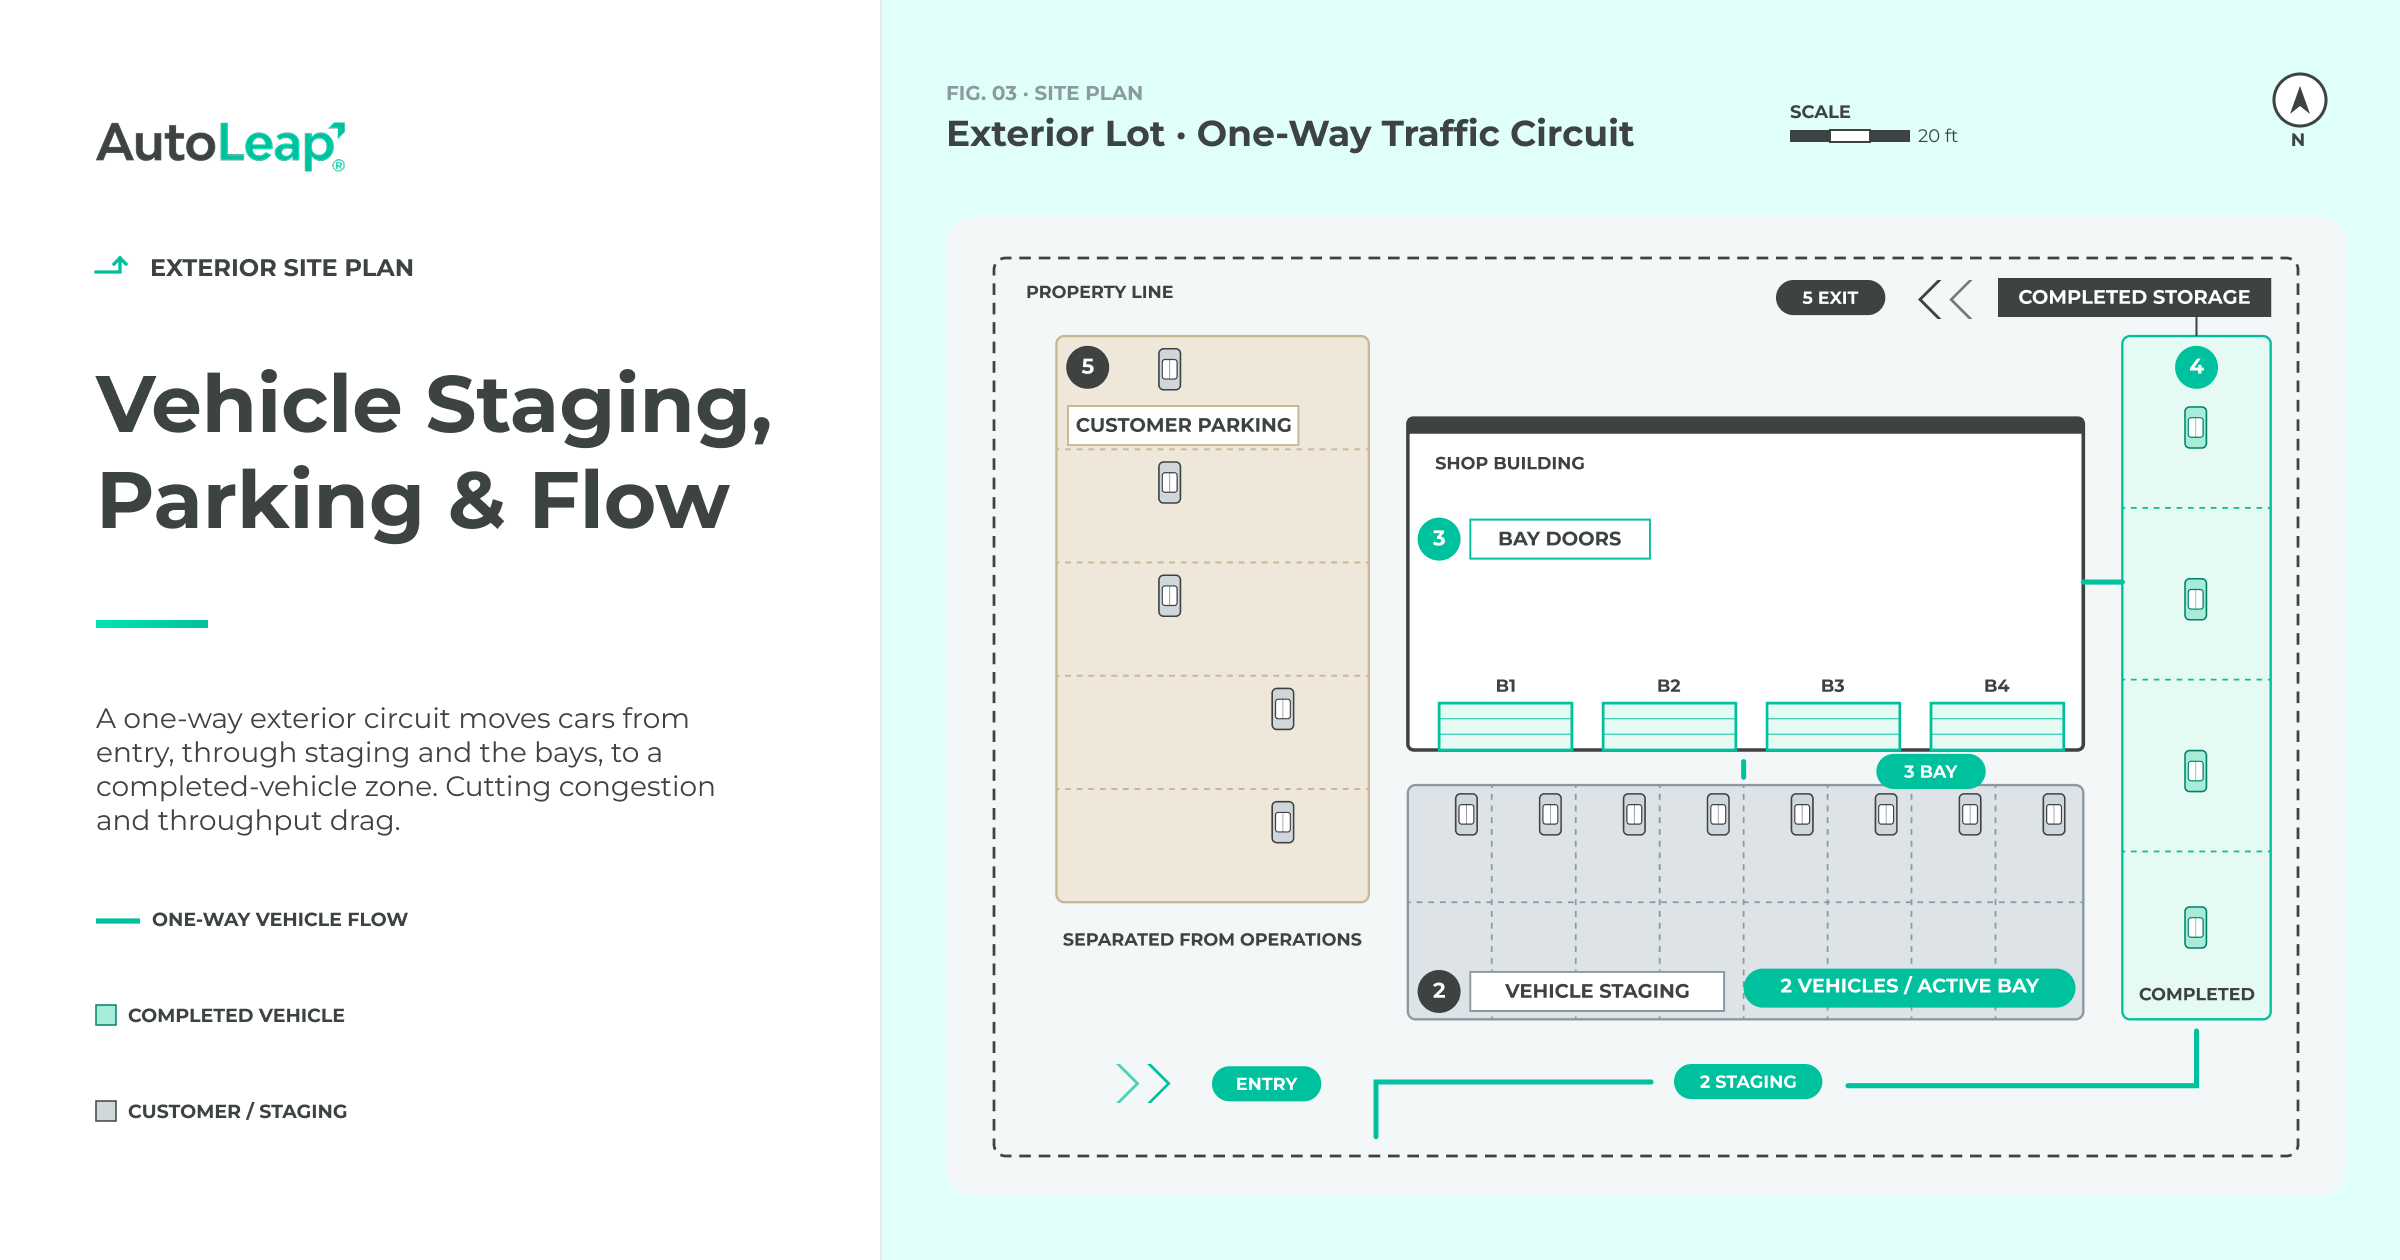
Any unnecessary vehicle movement is fueling wasted labor (not billable) and congestion, which is directly affecting shop throughput. A separate staging area between the entry and bay doors ensures vehicles arriving at the facility are kept orderly while waiting for parts, approvals or bay clearance.
Provide staging areas for a minimum of two vehicles for each active bay. This is so vehicles can stage directly into any service door without backing across traffic lanes. The width of bay doors should be at least 10 feet wide and 12 feet high for standard cars and vans. The larger dimensions are needed for truck and van shops. Proper sizing from the beginning of construction helps to reduce costly post-construction changes and aids in the flow of vehicles during high operating hours.
Customer Parking and Completed Vehicle Storage
All customer parking should be kept away from the vehicle staging and completed vehicle storage areas. If all of the parked vehicles are together, incoming, in progress, and completed vehicles may not be easy to distinguish when it is time to pick up. This confusion results in unnecessary calls to the front desk service advisors and adds unnecessary delays during busy times.
The improved arrangement involves vehicles being stored in a well-marked area close to the customer exit. Organized parking rows, signage and pavement markings help customers easily see where to park their vehicle, making for a smoother pickup. The separation of these zones also helps to prevent traffic jams and cross-access of vehicles in the work zones.
Additionally, planning for ADA parking should be considered from the outset of exterior planning. Curb access should not be obstructed, and accessible parking spaces should be located next to the customer entrance. This requirement is one that many shop owners neglect when building their shop, and may end up regretting the omission later on and have to pay for a retrofit.
It is common practice to take care of a parking lot after installation by restriping, repaving, changing the drainage and making curve adjustments. It is much more cost-effective to incorporate accessible parking in the original exterior design of the facility than to make retrofits after the facility has been built. This will keep the parking space accessible and offer a safer and more convenient customer experience.
4. Safety Layout: Compliance, Ventilation, and Hazard Zones
OSHA Requirements That Affect Your Floor Plan
Safety layout isn’t a compliance checklist. Location of emergency exits, hazardous materials, fire suppression equipment and ventilation systems all impact OSHA compliance, technician safety and even insurance coverage.
Shops that have noncompliant layouts may find:
- They are not able to pass inspection
- Permits are not issued on time
- Insurance premiums are increased
- Claims are denied following workplace incidents.
As per OSHA rules for auto repair shops, permanent exit routes need to be 28 inches wide, accessible and not obstructed at all times. Two well-defined emergency exits must be provided for each service bay. Open aisle ways free of mobile equipment or storage racks should be provided in every service bay. Fire extinguishers should be located within 75 feet of any location within the service area.
Ventilation, Exhaust Extraction, and Flammable Material Placement
Ventilation planning should begin during the floor plan stage, not after construction. Automotive exhaust contains carbon monoxide, carbon dioxide, and harmful particulates that build quickly inside enclosed bays. Professional shops use direct exhaust extraction systems with flexible hoses connected to vehicle tailpipes and routed outside the building.
Connection points should remain accessible from every service bay. Flammable liquids, including solvents, fuel, brake fluid, and paint products, should remain inside fire-rated storage cabinets or dedicated fire-rated rooms. It must be positioned away from welding stations, electrical panels, and battery charging equipment. Ignoring safety requirements during design often forces expensive structural modifications later. This is especially when permit reviews identify missing ventilation lines, blocked exits or located storage areas. This is why it is important to understand permit requirements to open a mechanic shop.
When designing a shop layout, safety with the use of professional-grade LED lights and hard floor surfaces is recommended. High-output LED fixtures installed above the lifts eliminate shadows in the engine bay and around work areas. This allows the technicians to see more and will result in lower energy costs over the lifetime of the fixture than a fluorescent fixture would.
Slip-resistant epoxy-coated concrete flooring in auto parts storage and areas that are subject to water, oil, brake fluid and other automotive chemicals helps to reduce the risk of falls. These coatings also enhance shop cleanliness, make maintenance easier, and allow technicians and customers to look more professional.
5. Waiting Room and Customer-Facing Design: Modern Examples
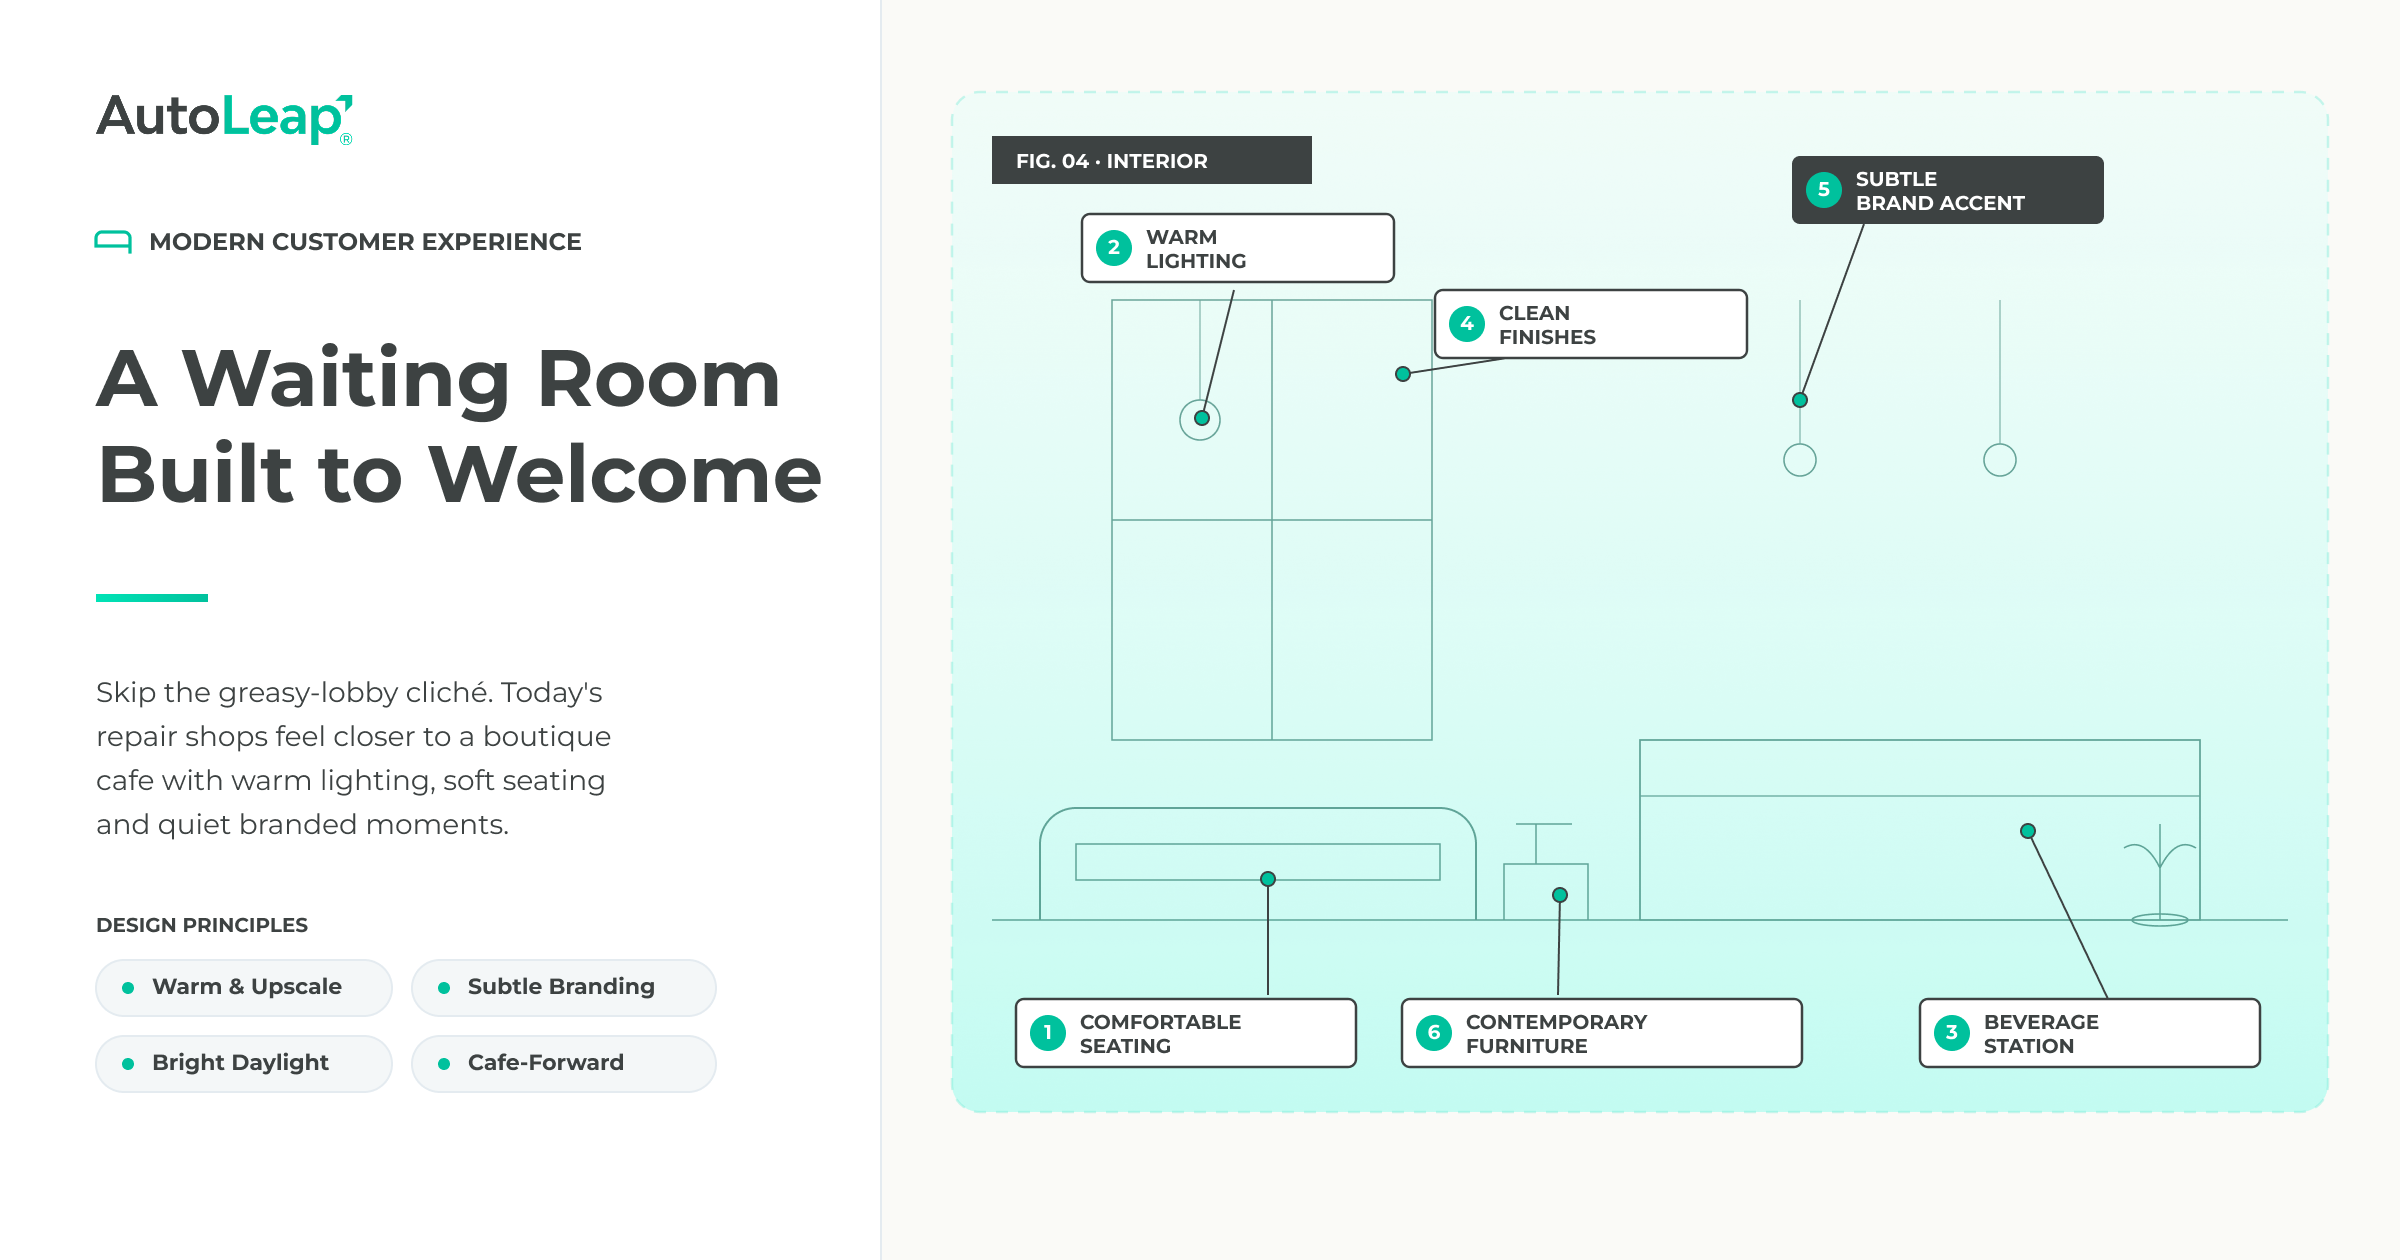
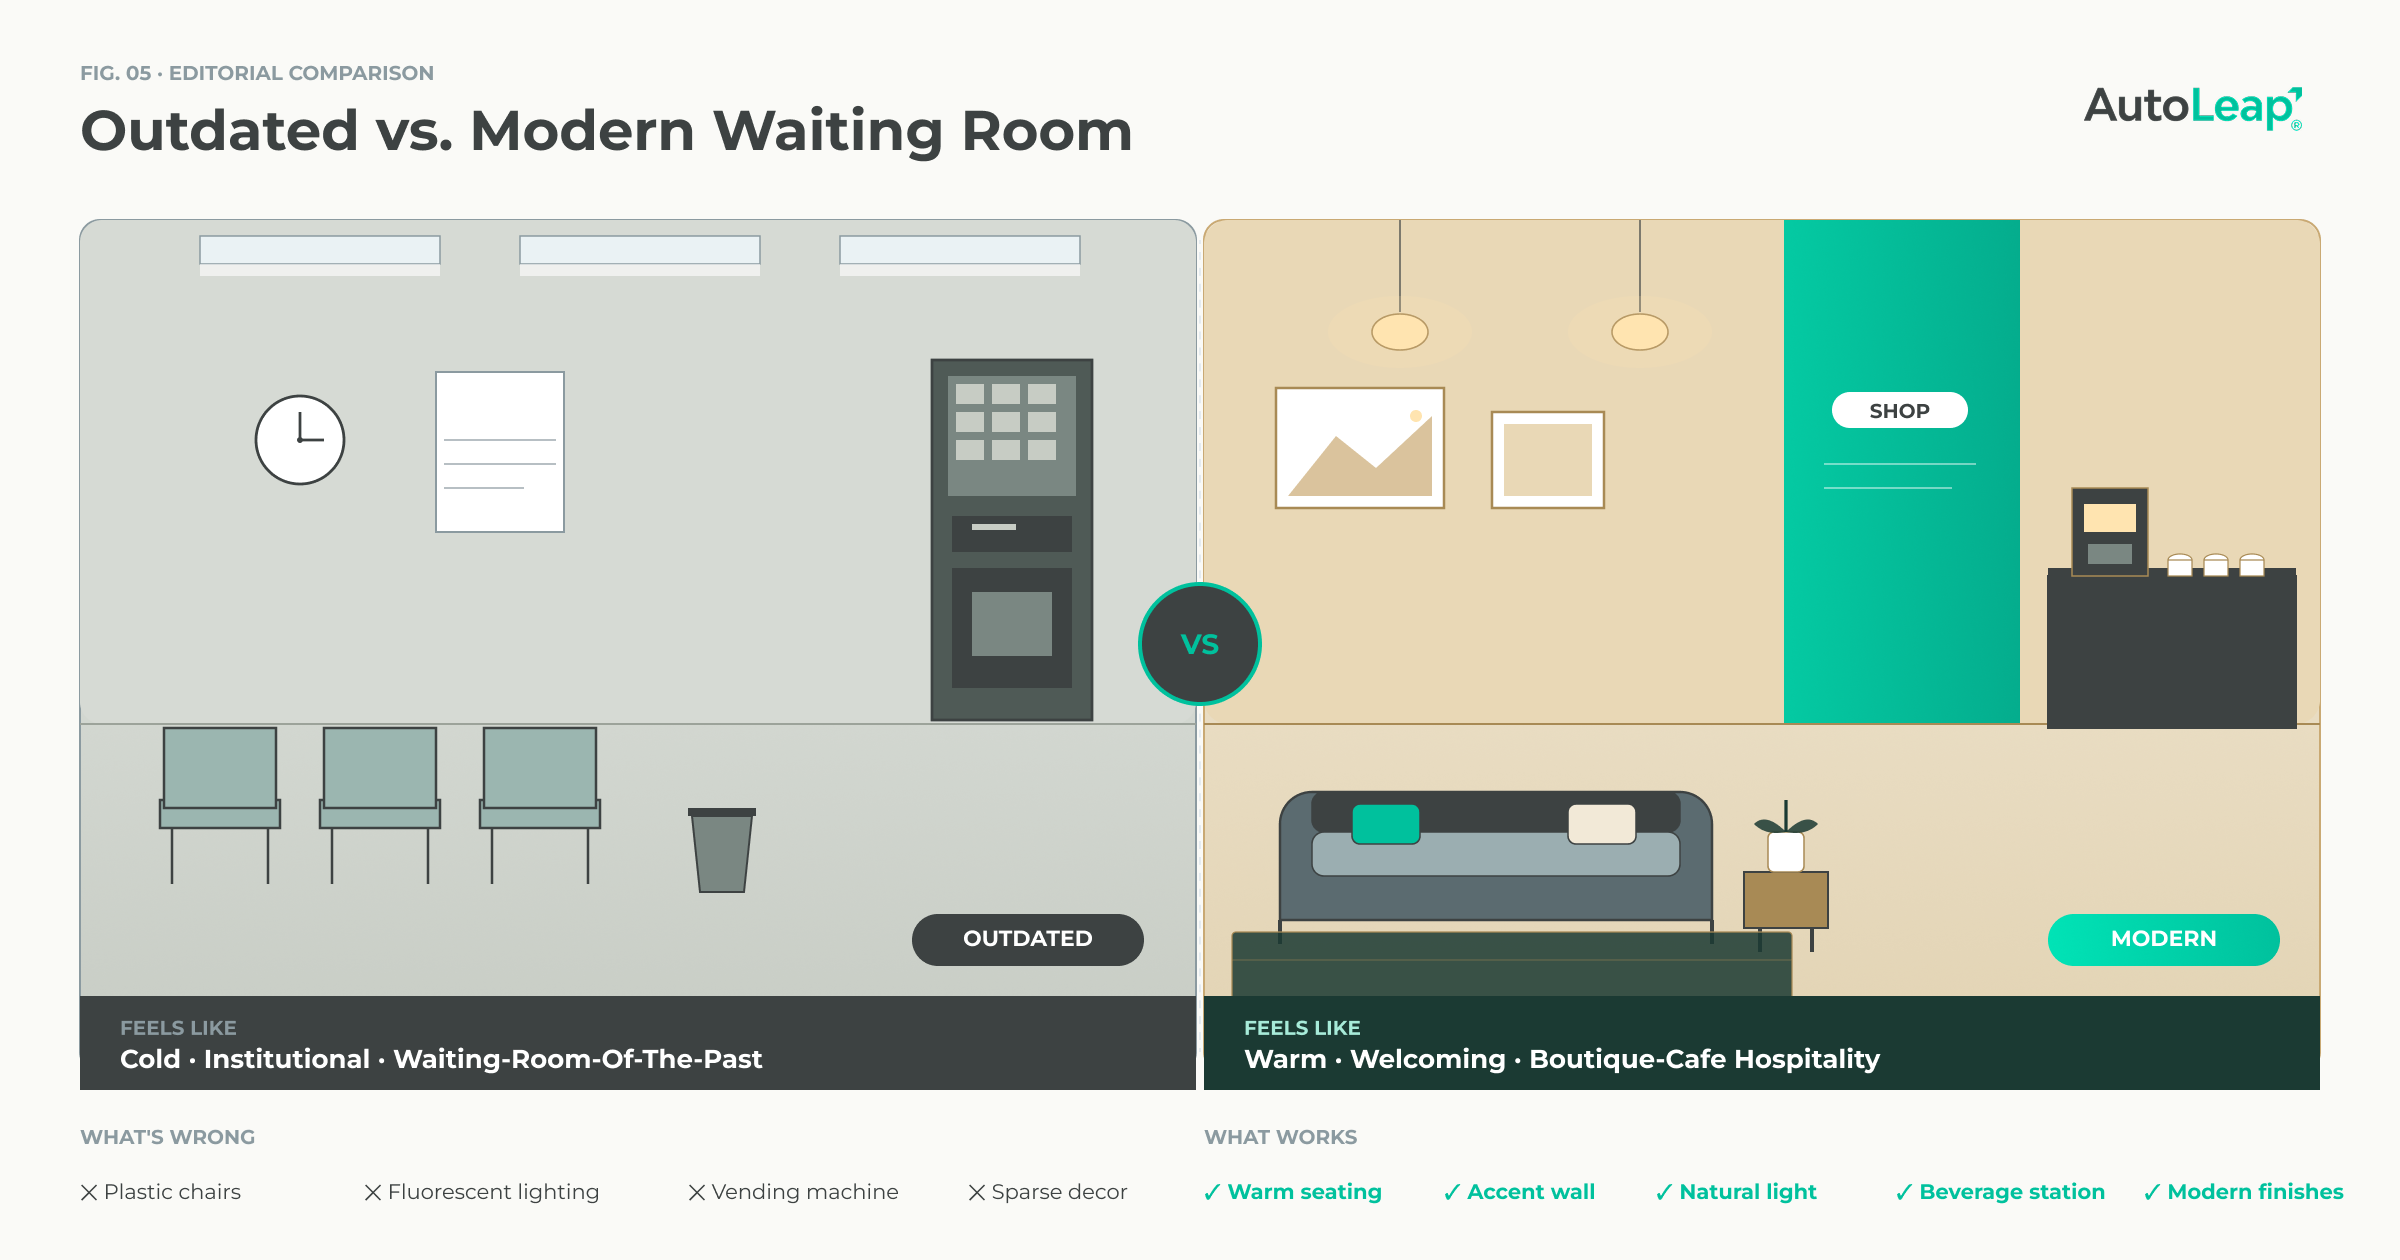
What Separates a Modern Auto Repair Waiting Room From a Basic One
Waiting rooms are commercially important as it shapes customer perception and long-term loyalty. JD Power reports that approximately 64% of auto service customers wait on-site during vehicle maintenance, serving as the main battleground area for trust to be gained or lost. This is why a modern waiting room reflects professionalism, transparency and care.
Use the reception area as a functional workspace, rather than a customer greeting counter. Service advisors require adequate desk space to schedule, prepare estimates, invoice, perform CRM activities and receive phone calls from customers without the frequent interruption of waiting for customers. Best layouts include a workspace for the advisor that has direct access to the entrance, but will provide some separation from the waiting area. This will enable staff to communicate with customers effectively, professionally and privately.
Design Elements, Colour, and Amenities That Build Customer Trust
Modern waiting rooms focus on comfort, layout and sensory design. Make your auto repair shop’s waiting room stand out with:
Design Element | Best Practice | Why It Matters |
Seating layout | Use upholstered chairs or sofas arranged to avoid direct face-to-face positioning. Prefer modular seating for flexibility during peak hours. | Improves comfort and privacy, and allows the space to adapt during busy periods without feeling crowded. |
Lighting | Install warm LED lighting in the 3000K–3500K range instead of fluorescent lighting. | Creates a calm, welcoming atmosphere and avoids the harsh, institutional feel of shop lighting. |
Beverage & refreshment station | Provide self-serve coffee, water, and light snacks instead of basic vending machines. | Enhances perceived service quality and improves overall customer satisfaction during wait time. |
Connectivity | Offer free Wi-Fi with clearly displayed login details and include charging ports at seats or tables. | Keeps customers connected and productive, reducing perceived wait time. |
Colour scheme & aesthetics | Use neutral base colours like soft gray, beige, or warm white with 1–2 branded accent colours. Avoid heavy automotive-themed decor. | Creates a professional, modern environment that feels trustworthy rather than industrial or cluttered. |
Separation, Sound Control, and Visual Transparency
Separation is a key element in the customer comfort and safety of a waiting area from the service bays. Customers tend to be less satisfied than those in separate environments when they are exposed to noise, odours, or visible repair activities. Where complete separation is not an option, floor-to-ceiling glass partitions with acoustic sealing offer an alternative. This gives the customer a view of their vehicle with a quiet, professional atmosphere that gives them confidence in the service process.
6. EV-Ready Bay Design and Future-Proofing Your Layout
What an EV-Ready Service Bay Requires That Standard Bays Do Not
An EV-ready service bay has a much bigger infrastructure planning process than a typical automotive service bay. Because of the high-voltage battery systems used in electric vehicles (from 400V to 800V), there are additional electrical, safety and structural requirements for a shop design. It would be advisable to provide a separate 240V Level 2 charging circuit for each EV bay, with a 50-amp dedicated circuit breaker for each bay.
Also, auto shops must have segregated insulated storage for tools and protective equipment rated at 1000V or higher. These are used when servicing batteries and high-voltage equipment. Separation from normal bays is also essential. If someone needs to work on the electrics live, their work is safely contained with floor markers or movable barriers. Conductive metal surfaces close to the high-voltage work area should also be avoided. With the increase in EV ownership, these requirements are no longer a luxury for independent repair shops.
Designing for Future Expansion Without Rebuilding
Designing a layout that is adequate for the future. This will minimize the cost of reconstruction when vehicle technology shifts.
One of the best solutions is to install conduit sleeves under the concrete slab during construction. These empty conduit pathways provide for future electrical wiring upgrades without having to cut into finished concrete. Structural columns should be spaced at least two feet on all sides to allow the subsequent addition of lifts, if desired. Additionally, if smaller doors are being installed, openings for bay doors should allow for larger vehicle types now and into the future. Retailers which don’t consider long-term EV growth could find that they need to replace their electrical panels at a higher cost in the future, or they could lose the services of a growing customer base.
7. Layout Ideas by Shop Size: Small, Mid-Size, and Large
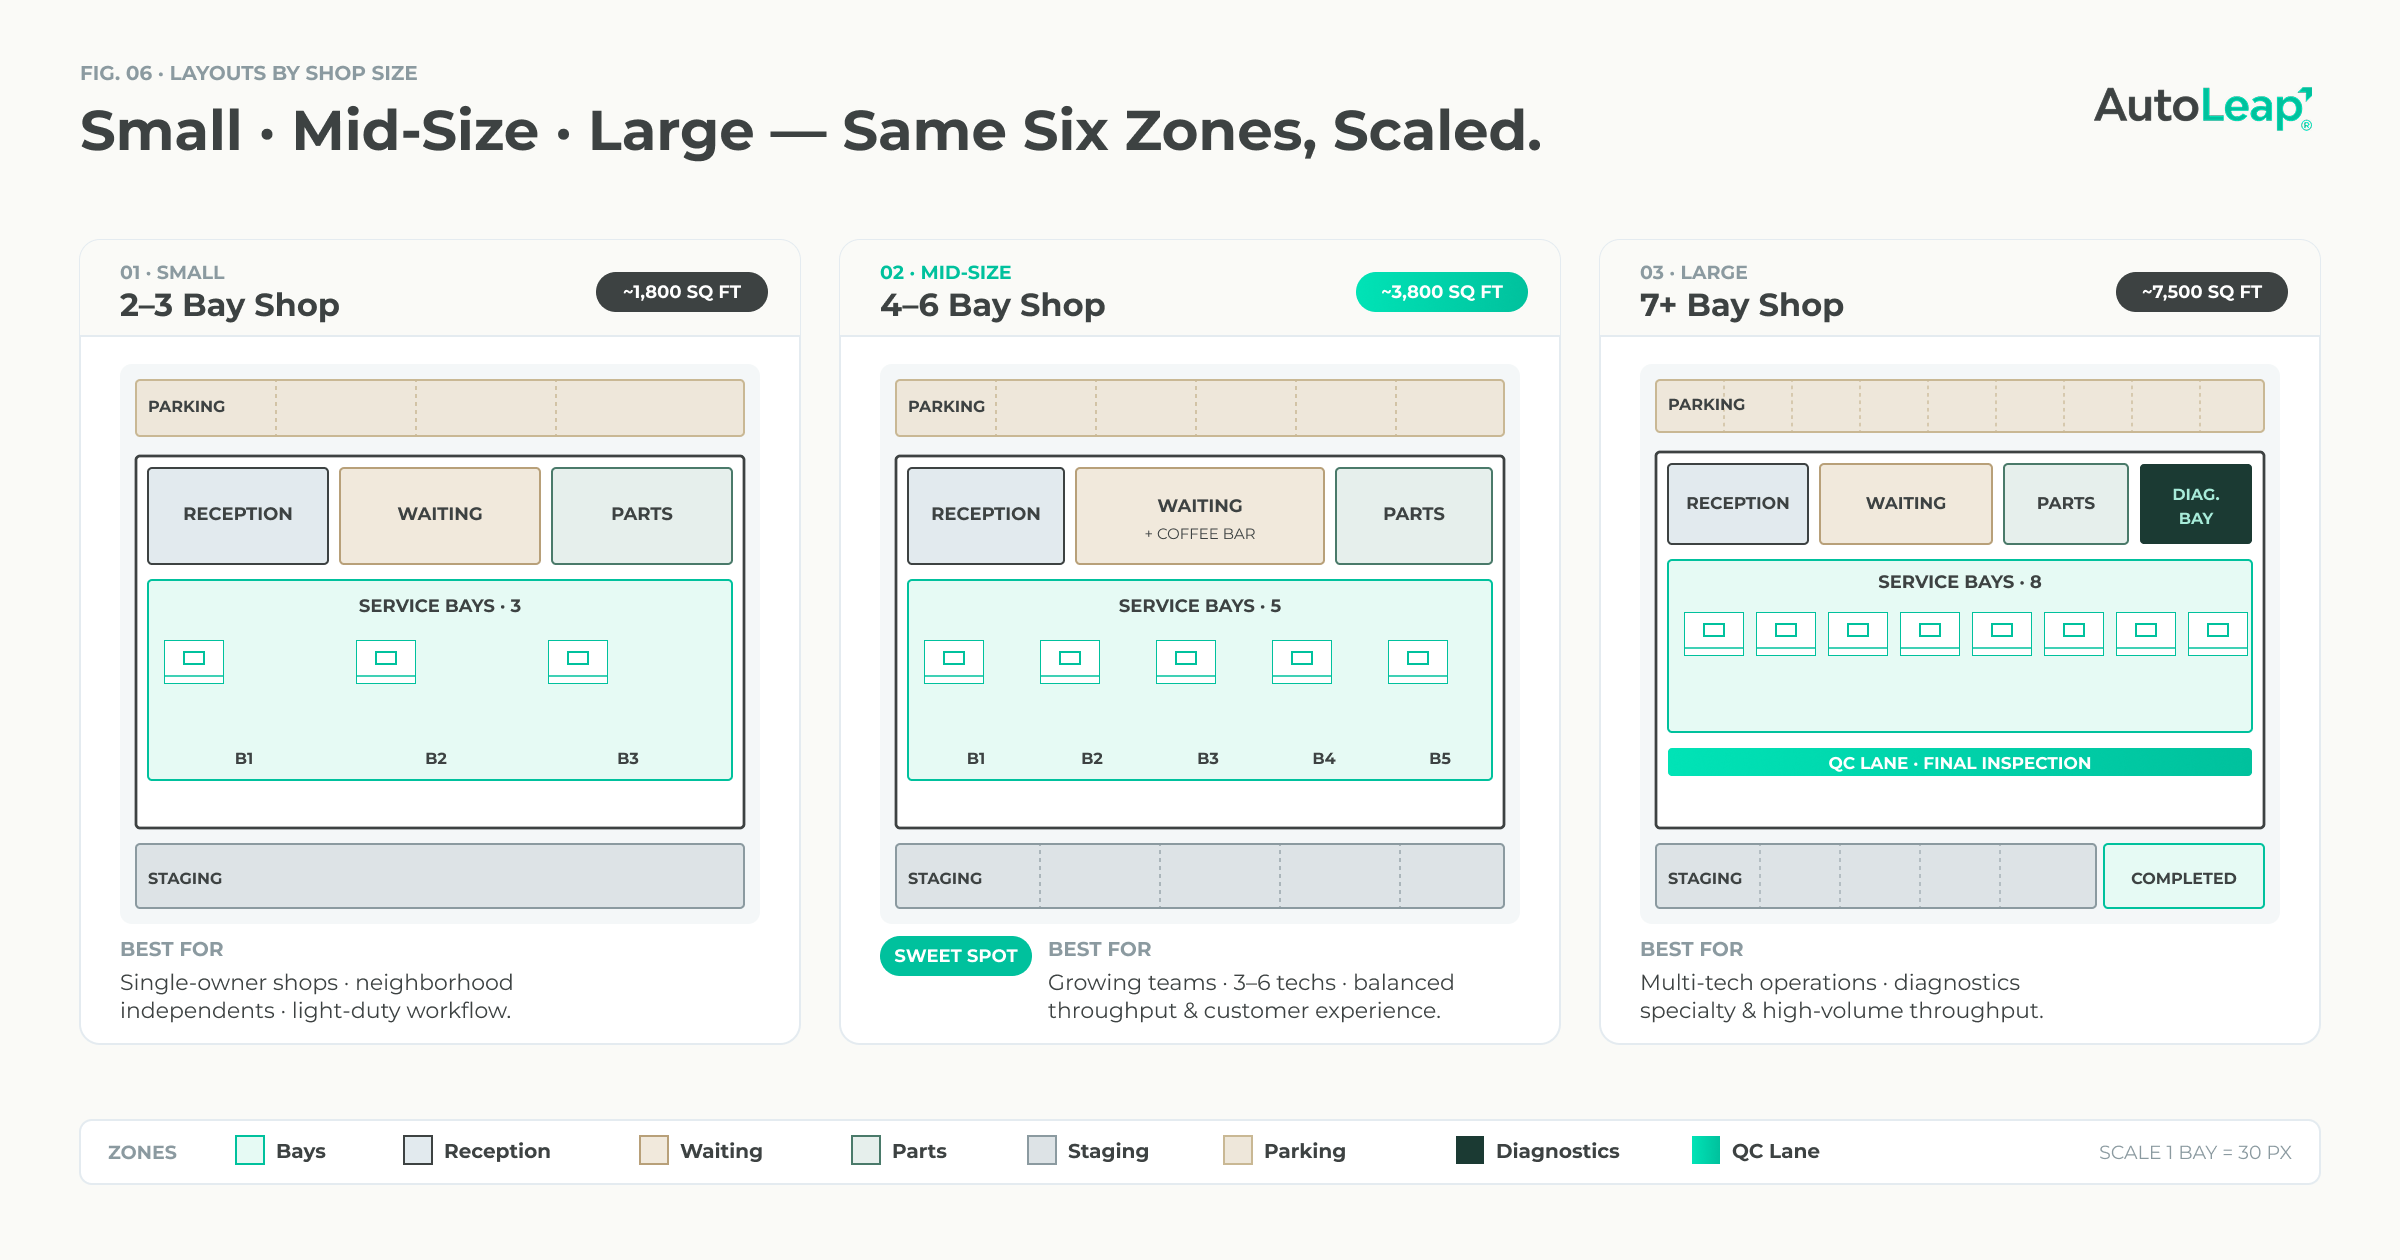
Small Shop Layout: 2–3 Bays
Small auto repair shops are working in a very limited space, between 1200 and 1800 sq ft. In this case, layout efficiency is a function of merging functions without confusing customer or technician bottlenecks. The reception and waiting room are frequently located in a common front area, separated by sight instead of by walls. This is to allow the most use of available space.
In most cases, the amount of parts storage is limited, such as wall-mounted shelving in the bay area and not a separate room. Sometimes, the technicians are also service advisors for simpler workflows. The most difficult aspect of small shop design is to effectively separate customer areas and production areas. Often, a glass partition wall between reception and service bays is the best answer, as it maintains sight and reduces noise and clutter.
Mid-Size Shop Layout: 4–6 Bays
3,000 to 5,000 square foot shops are considered mid-size. These shops should have functional zoning to prevent any slowdowns in operations. A dedicated area at this point is critical, such as a separate waiting room, reception area and parts storage room. There is also a need for a staging area with 6-8 vehicles to keep the vehicles moving.
Technician movement efficiency is the key design element. Whatever way you organize the bays, if the parts room is not centrally located, this will drop the pace of every repair order. At this stage, it’s advantageous to consider the typical expenses to start an auto repair shop by size.
Large Shop Layout: 7+ Bays
For larger stores (6,000 to 10,000 square feet), there needs to be more advanced segmentation of the workflows within the bay area itself. There are specific diagnostic bays, express service bays for quick jobs and separate full-repair bays. In addition, a quality control lane should be provided for final inspections before moving vehicles into completed storage.
It’s a communication issue, not a space issue, at this scale. If you don’t have job visibility spanning multiple bays, it’s easy to see how delays quickly get out of hand. A lot of effective outlets employ digital monitoring, budget on average cost to open a shop by size, and shop management software that links everything throughout each bay.
A frequent pitfall is to underestimate the number of staff that you need: one service advisor can handle 3-4 bays at a time, and if you have a 7+ bay shop, you will have to have more than one service advisor. This is to prevent communication issues that no layout change can resolve.
Conclusion
An efficient and scalable repair shop starts with a well-designed layout. But the real work of coordinating all activities within the space, such as booking, electronic bookkeeping, customer communication and invoicing demands connected technology. Once that keeps every bay and member of the team in sync in real time. Reliable auto repair shop management software is essential for running a successful repair shop. It enables shop owners to gain visibility into their auto service workflows, minimize delays, and provide a more consistent customer experience.